How to enable Zowie Ecommerce Tracking features?
Business Context
Zowie Ecommerce Tracking allows users to benefit from a variety revenu-focued features such as proactive chats, buying intent detection, 360-view of customer, and revenue tracking.
Assisted revenue attribution model
Zowie will attribute the assisted revenue according to the following model:
- If Zowie Chatbot answers at least one customer's question, there was not handover to an agent, and customer placed order within 48h from conversation, then revenue will be attributed to Zowie Chatbot.
- If there was handover to an agent, and customer placed order within 48h from conversation, then revenue will be attributed to agent.
- Both (1) and (2) will be attributed as revenue assited by your Customer Service team.
Enable for Shopify
Before continue please verify whether you're still using checkout.liquid or new Checkout Extensibility. Shopify will be sunsetting checkout.liquid, learn more by visiting this documentation.
Configuration for Checkout Extensibility
To enable Zowie Ecommerce Tracking you should use built-in mechanism: Custom Pixels. Please follow the following steps to add Zowie Ecommerce Tracking to your Shopify.
- Visit the admin panel of your Shopify store.
- Go to Settings -> Customer events -> Add custom pixel.
- Name your pixel with
Zowie Tracking. - Make sure that the following options are selected:

- Replace example code with the following code in the
Codesection in the editor of a custom pixel.
(function(d, s, id, cb) {
    var js = d.createElement(s);
    var n = d.createElement("div");
    n.id = id;
    if (js.readyState) {
        js.onreadystatechange = function() {
            if (js.readyState === "loaded" || js.readyState === "complete") {
                js.onreadystatechange = null;
                cb();
            }
        };
    } else {
        js.onload = function() {
            cb();
        };
    }
    js.src = "{YOUR_WIDGET_URL}";
    document.body.appendChild(js);
    document.body.appendChild(n);
})(document, "script", "chatbotize", function() {
    Zowie.init({
        instanceId: "{YOUR_INSTANCE_ID}",
        startOnOpen: true,
        headerMode: "white",
        onLoaded: () => {

            analytics.subscribe("checkout_completed", event => {
                Zowie.trackPurchased(
                    event.data.checkout.order.id,
                    event.data.checkout.lineItems.map(item => ({
                        "productId": item.variant.product.id,
                        "variantId": item.variant.id,
                    })),
                    parseInt(event.data.checkout.totalPrice.amount * 100, 10),
                    event.data.checkout.totalPrice.currencyCode
                )
            });

        }
    });
});- It should look like the screen below:
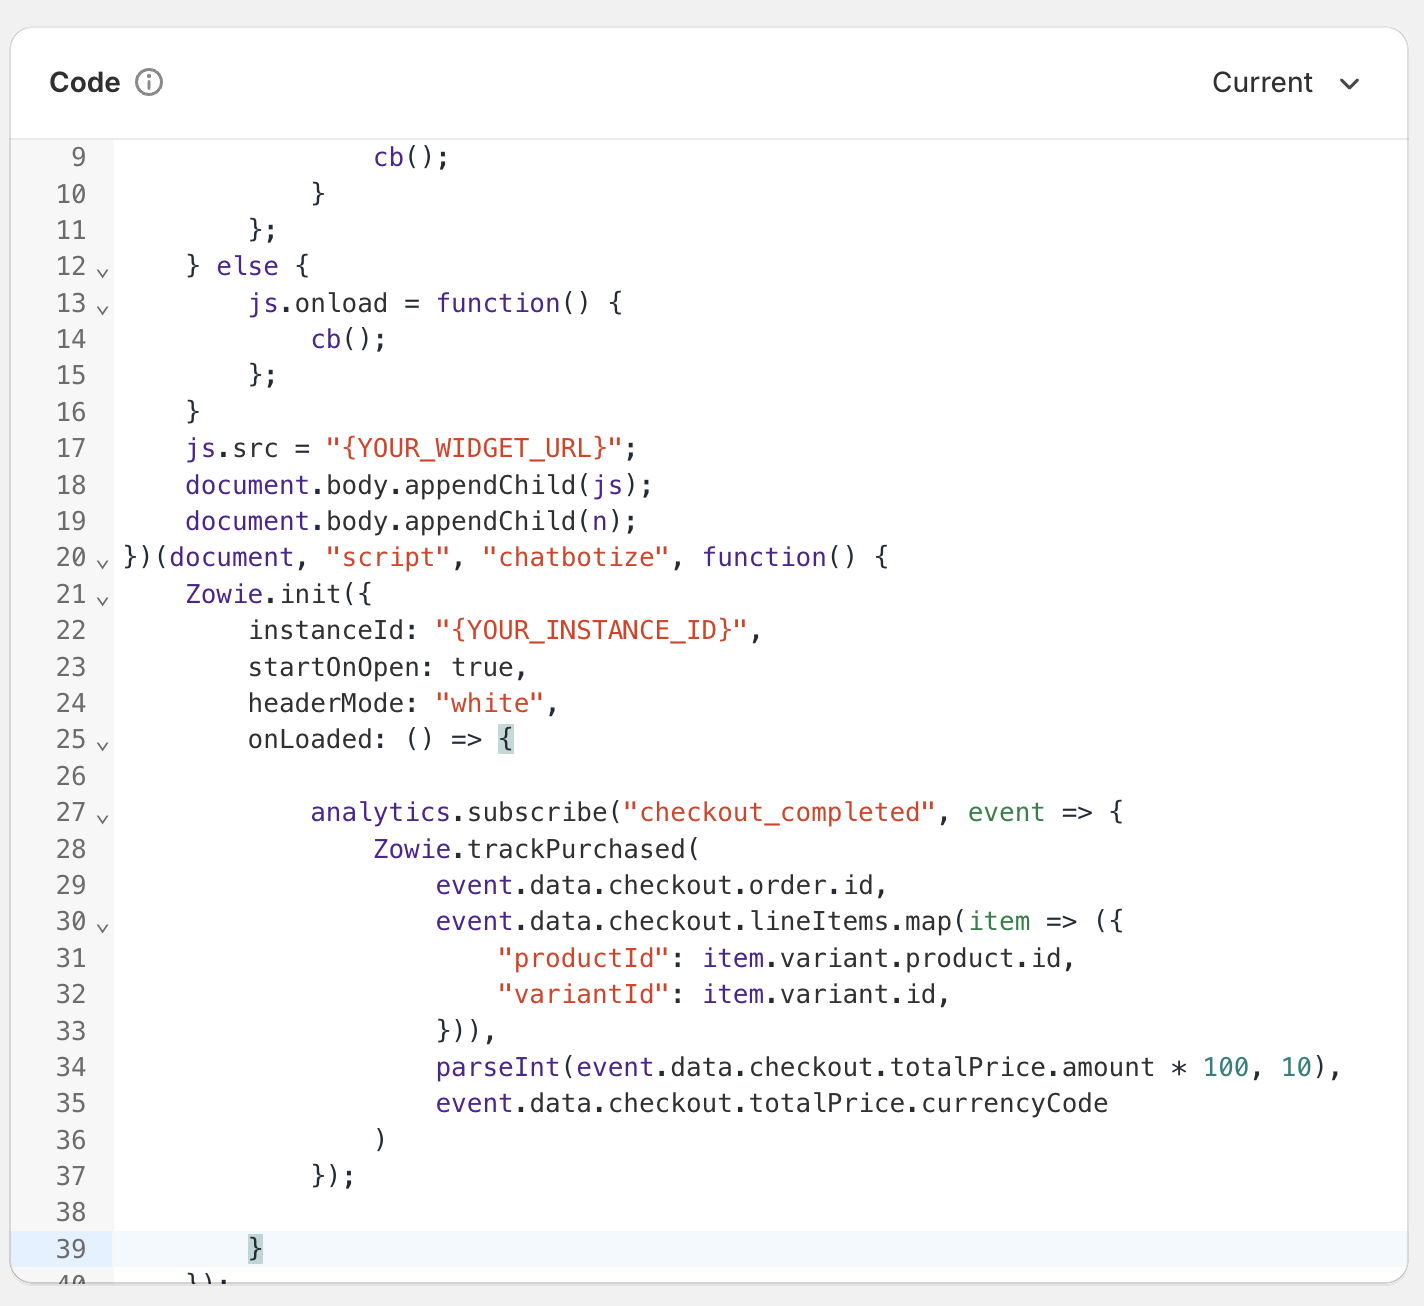
- Please make sure that
{YOUR_WIDGET_URL}is replaced with your company's value. - Please make sure that
{YOUR_INSTANCE_ID}is replaced with your company's value.
You can check the above values by logging into Zowie and visiting Channels -> Widget -> Show code in the top right corner.
- Click
Savein the top right corner. - Click
Connectin the bottom of the screen (just under the code editor). You're all set!
Configuration for checkout.liquid
Zowie offers out-of-the-box integration for Shopify, you can enable thisin Zowie.init(...) function.
Zowie.init({
 ...
 ecommerceShopifyTracking: true
 ...
});
If your widget is already live, you can avoid changing code by asking your Customer Success Manager to turn on tracking remotely.
Please note that built-in Shopify tracking works for non headless versions of Shopify using standard Liquid templates and Shopify Checkout.
Enable for non-Shopify platform
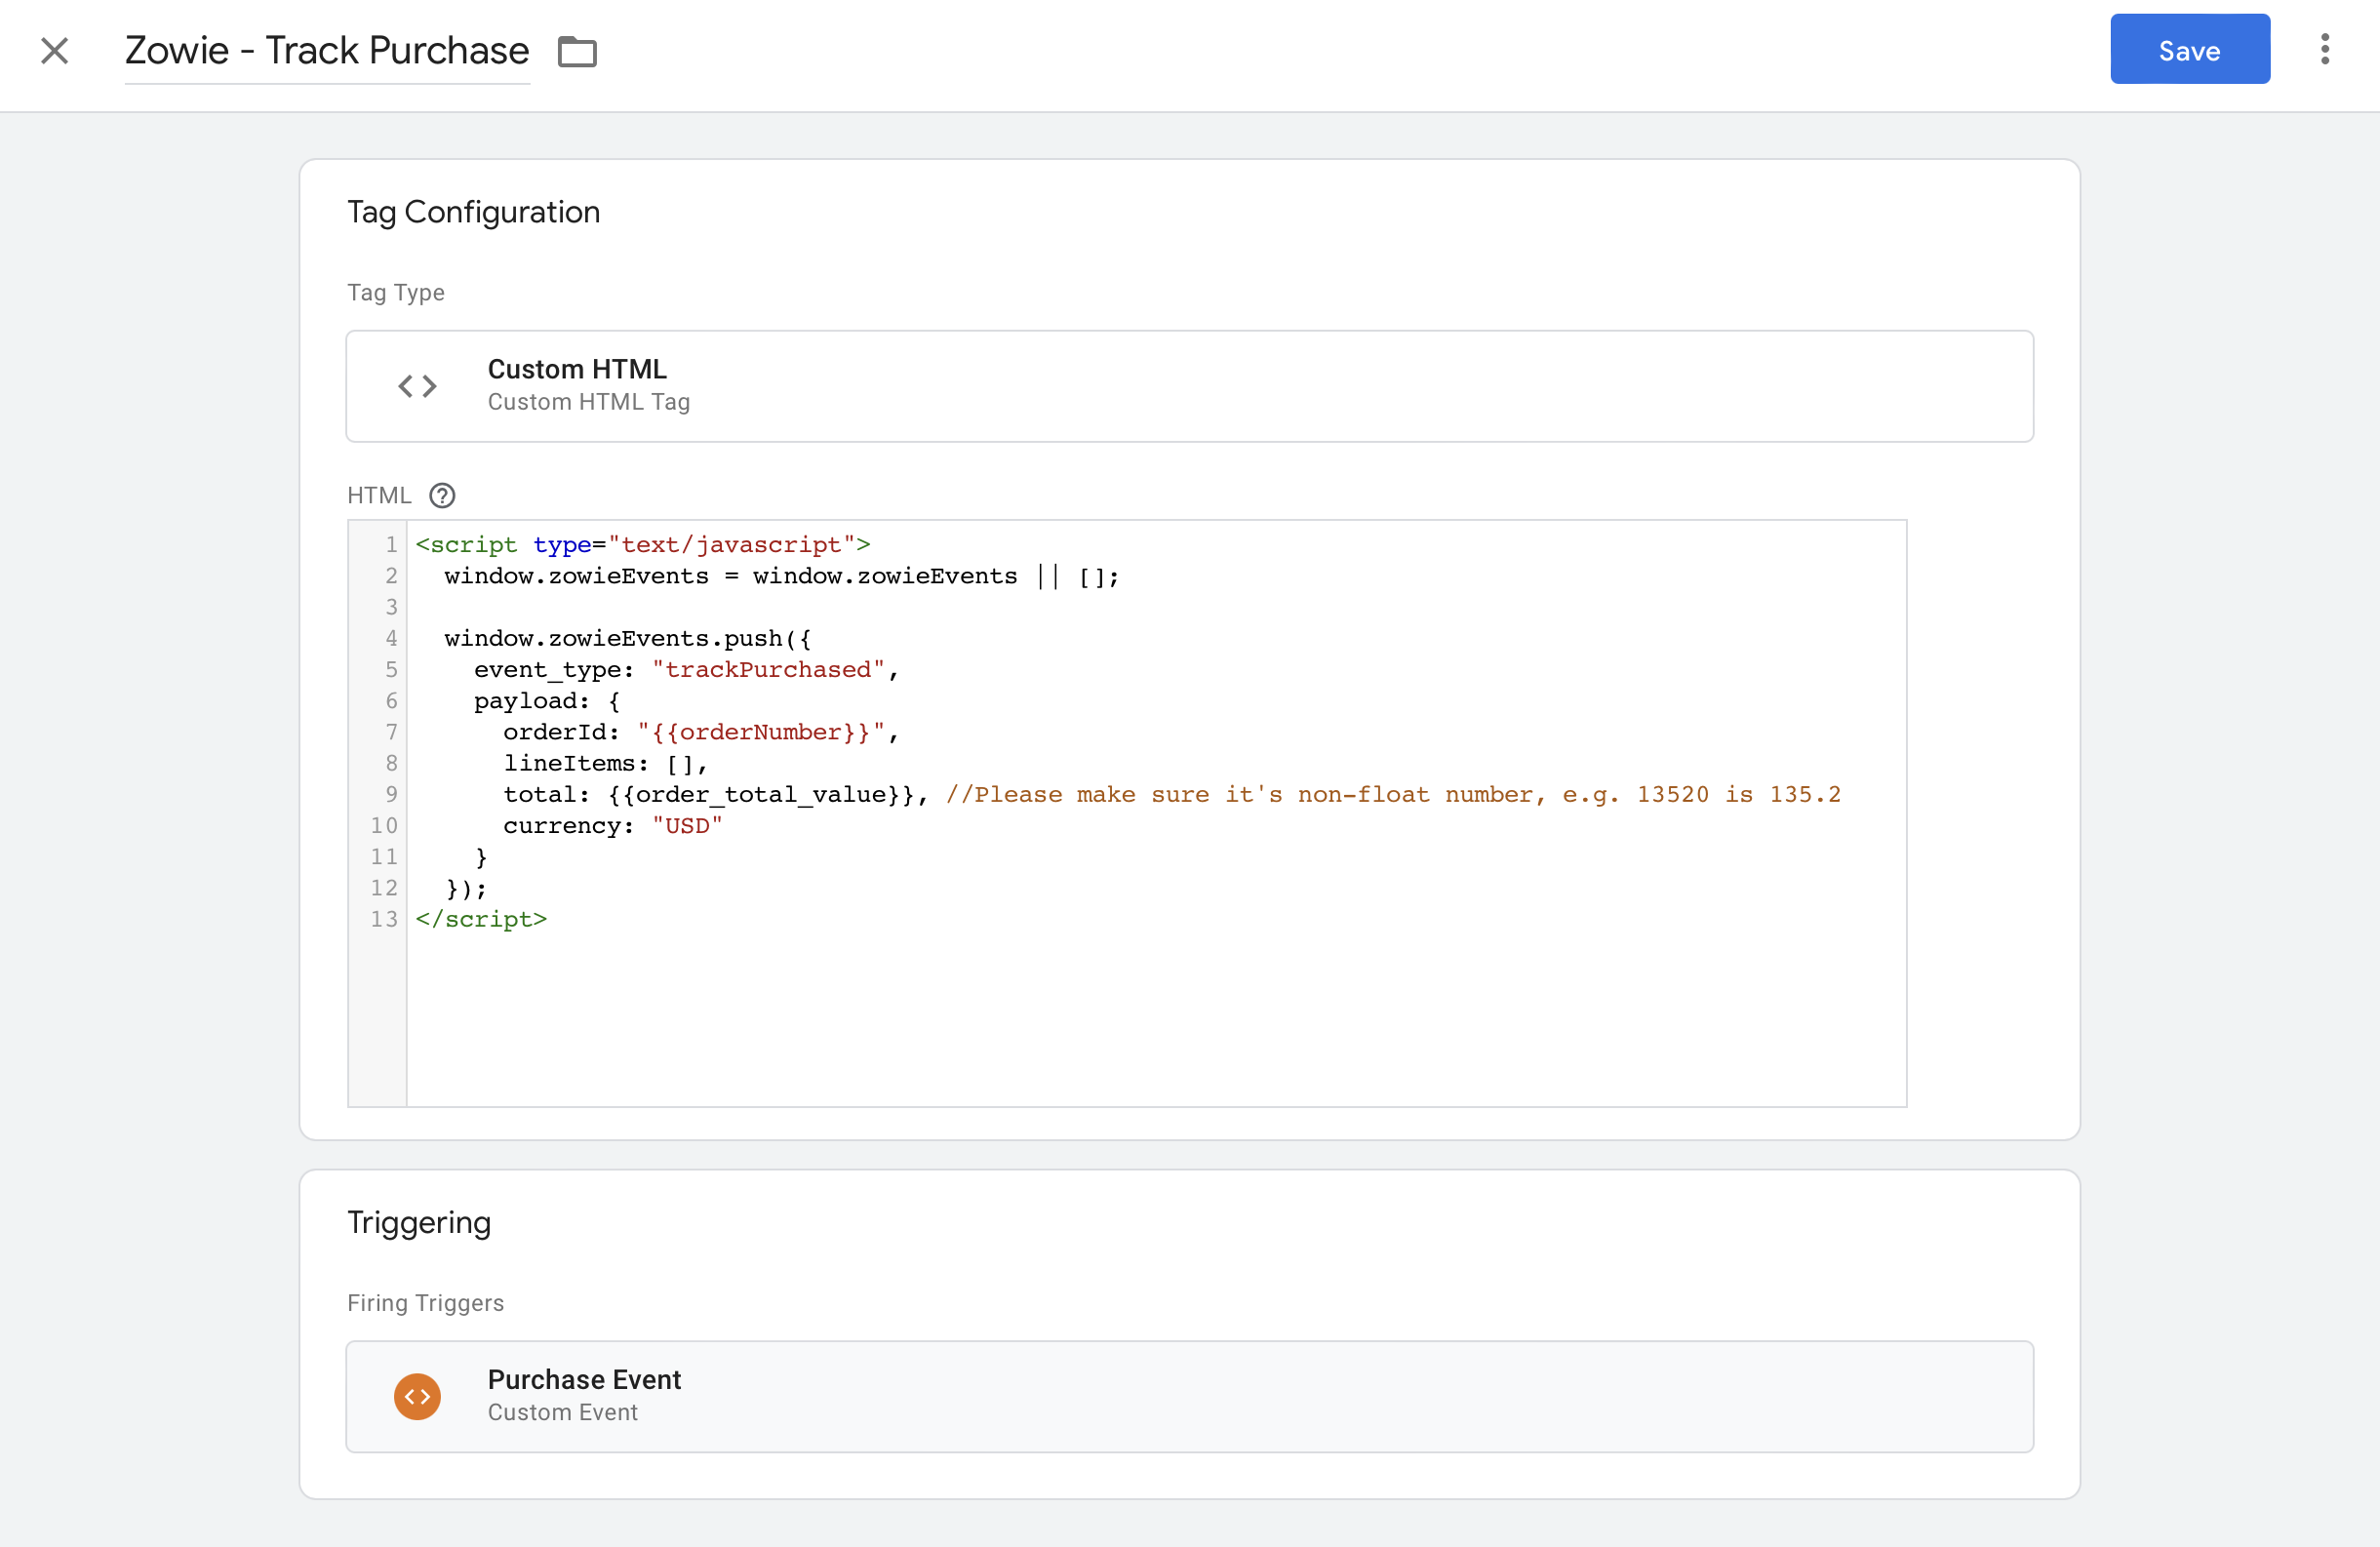
In order to track attributed revenue with Zowie, please use the following method when the purchase event occures in your platform:
window.zowieEvents = window.zowieEvents || [];

window.zowieEvents.push({
  event_type: "trackPurchased",
  payload: {
    orderId: "example_order_number_1",
    lineItems: [],
    total: 100,
    currency: "USD"
  }
});
Tracking with Google Tag Manager
Please make sure to have Zowie Widget configured. Instructions can be found here. How to install Zowie Widget?
The above tracking code can be easily added as tag to your Google Tag Manager. The tag should be trigger on purchase event:
Tracking additional events
If you're looking for more comprehensive integration and detailed API, please visit our documentation here.